
A mention of the deep web can bring to mind images of drugs, hackers, and other criminal activity. Despite the presence of these elements, the Tor network is a valuable tool for preserving privacy and anonymity. Browsing the deep web and any hidden services can be as simple as downloading the Tor Browser Bundle. In this guide, we will learn how easy it is to host our own hidden services and make them accessible via a custom onion address.
Step 1Understanding How the Tor Network Works
Accessing the internet directly without a proxy, VPN, or other privacy service relays information in a relatively linear fashion. A device attached to the internet via a router follows a series of lookup requests for a specific URL or IP address, and returns the content to the device which requested the information.
The contents of the transmission may be encrypted using HTTPS, SSL, or another form of encryption, but the requests are still directly connected to IP addresses on each end of the transaction, and carried in a way which can be analyzed by an ISP. In short, your ISP can see where you go on the web.

While the Tor network doesn't entirely bypass an internet service provider in the way a meshnet could, it does utilize a unique method of obfuscating traffic. Rather than directly requesting a webpage or other data by directly addressing a server by it's IP, traffic routed over Tor sends the encrypted details of its requests to an entrance node from a list of retrieved nodes within the Tor network first.
That traffic is then carried over several more hops to different nodes in the Tor network, before either reaching it's destination within the Tor network, or being carried back into the internet through an exit node.

Unfortunately, this entrance back into the internet from the Tor network poses a security and privacy risk. The content passed over the exit node is subject to the trustworthiness of the node itself, as the node has the same level of access to the details of a request as an ISP would. If the data is not encrypted at this point, it is subject to being captured and used maliciously, as demonstrated by chloe in BADONIONS.
To avoid the danger of using exit nodes, we can instead access or host a website which is accessible only and entirely through the Tor network, in the form of a hidden service. Rather than requesting a URL or IP address, the service will be accessible only through an "onion" address, which can only be discovered by its name within the Tor network.
Step 2Browsing Hidden Services
The Tor Browser Bundle is available from the Tor Project's website for Windows, macOS, and Linux/Unix systems. Once installed, you can open the browser, and it will automatically connect to the Tor network.

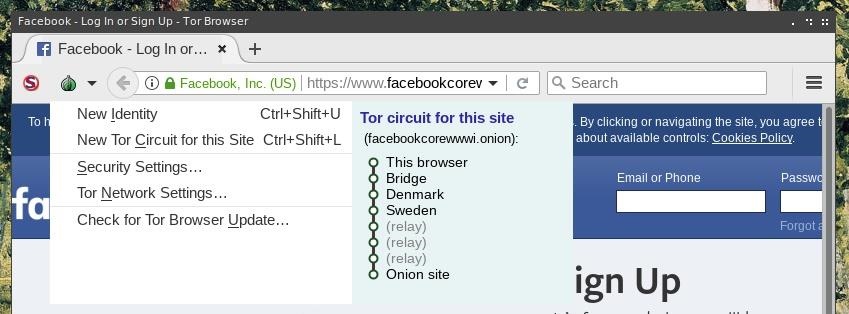
We can view our route through the Tor network by clicking the drop-down arrow next to the onion icon in the upper left of the window. In the case of visiting a .onion site, we can only see the last relays and the "Onion Site" listed in the circuit information.
If you need more information on using the Tor browser, you can check out our guide on it linked below.
Step 3Hosting a Server
The first step in configuring a Tor server will be setting up a way to serve HTTP content, just the same as a regular webserver might. While we might choose to run a conventional webserver at 0.0.0.0 so that it becomes accessible to the internet as a whole by it's IP, we can bind our local server environment to 127.0.0.1 to ensure that it will be accessible only locally, and through Tor.
On a system where we can call a Python module directly, we might choose to use the http.server module. After changing directories to one which contains content we would like to host, we can run a server directly from the command line.
Using Python3 and http.server, we can use the following string to bind to 127.0.0.1 and launch a server on port 8080..
python3 -m http.server --bind 127.0.0.1 8080

Either of these will serve as enough for a test server, but for any larger or more permanent project a full hosting stack will be more useful. Nginx provides a server backend which can be more suitably hardened and secured against the potential threats against a hidden service, although Apache or other HTTP server software can certainly work. Just be sure that it's bound to127.0.0.1 to prevent discovery through services such as Shodan.
If you have Fing network scanner, you can confirm this is working by running the following in a console.
fing -s 127.0.0.1 -o text,console
You should see output like the image below if your server is running.

To assure that our server is functional, we'll want to test our local address (127.0.0.1) or "localhost" in a web browser by opening it as an address followed by a port number, as seen below.
http://localhost:8080
In order to make testing the server easier, it may be useful to create an "index.html" file in the directory from which the server is being run. Something as simple as the file below will work.
<html>
<body>
Null Byte
</body>
</html>
The result will look like the following image, if it's working properly.

With our local server environment configured and available at 127.0.0.1:8080, we can now start to link our server to the Tor network.
Step 4Creating a Hidden Service
First, we will need to install or confirm that the Tor service/daemon is installed. The standalone Tor service is an active separate of the Tor Browser Bundle package, and for Linux/Unix is available here. On Ubuntu or Debian based distros with apt package management, the following command should work assuming Tor is in the distro's repositories.
sudo apt-get install tor
To confirm the location of our Tor installation and configuration, we can use "whereis"
whereis tor
This will show us a few of the directories which Tor uses for configuration. We're looking for our "torrc" file, which is most likely in /etc/tor.

We can move to that directory with "cd", as we run the command below.
cd /etc/tor
Finally, confirm that "torrc" is present by simply running "ls"
If the torrc file is present, we will want to edit it. We can use vim, emacs, or simply GNU nano to edit the file. To edit the file in nano, simply run the following in terminal.
nano torrc

The section we wish to edit follows this banner:
############### This section is just for location-hidden services ###
We can jump directly to this section by pressing Ctrl+W, typing "location-hidden" and pressing Enter. In order to direct Tor to our hidden service, we'll want to un-comment two lines.
HiddenServiceDir /var/lib/tor/hidden_service/
HiddenServicePort 80 127.0.0.1:80
To do this, we simply remove the "#" symbols at the beginning of those two lines.

Next, we'll want to correct the port on which Tor looks for our server. If we're using port 8080, we'll want to correct the line from port 80 to port 8080. We will change the original seen below to the correct port number.
HiddenServicePort 80 127.0.0.1:80
We will change this to port 8080, as seen here.
HiddenServicePort 80 127.0.0.1:8080

We can write our changes to the file with Ctrl+O and exit the editor with Ctrl+X
Step 5Testing the Tor Service
With the changes written to our torrc file and a server running at 127.0.0.1:8080, making our server accessible over Tor is as simple as starting the Tor service. We can do this from the command line by typing the following.
sudo tor

Upon starting Tor for the first time with our new configuration, a .onion address will be generated automatically. This information will be stored in "/var/lib/tor/hidden_service" (or another directory if specified in the torrc file). We can move to this directory with cd, as seen below.
cd /var/lib/tor/hidden_service
After running ls to ensure that both the "hostname" and "private_key" files are in the directory, we can view our newly generated address by running cat in a terminal window as follows.
cat hostname

The string ending in .onion is our new hidden service address! While this one was automatically generated, we'll be able to customize it later to our preference.
We can test that our service is accessible by opening it in Tor Browser.

If the address resolves to your server, you've successfully hosted a hidden service!
Step 6Generating a Custom Onion Address
In order to customize our onion address, we'll need to generate a new private key to match a custom hostname. Due to the nature of Tor addresses being partially hashes, in order to create a custom address, we'll need to brute force the address we want.
The more consecutive characters of a word or phrase we'd like to use, the longer it will take to generate. This time concern is somewhat of an exponential function, as the longer the sequence is, the generation time will become longer in folds, rather than in a linear way.
There are several tools available for this task, Eschalot and Scallion being some of the more popular options. Scallion uses GPU cracking to generate addresses, Eschalot works using wordlists. For this tutorial, we'll use Eschalot.
Begin by cloning the Eschalot git repository with the following commands in terminal.
Next, cd into the Eschalot directory as seen below.
cd /eschalot
Finally, run "make" to install Eschalot.
make

To generate a custom address, we can use a command like the one below.
./eschalot -vct4 -p null
In this command, "4" is the number of CPU cores we wish to use, and "null" is the prefix, or first characters, of the address we're looking for. The program will continue to generate addresses with this prefix and a variety of suffixes. We can stop the program at any time by pressing Ctrl+C.
Once the program has generated an address you like, we can use it for our hidden service.

Step 7Adding the Onion Address to the Service
First, we should stop our Tor service from running. We can switch the window where "sudo tor" was run and press Ctrl+C.
After this, we'll want to replace our hidden service private key with the one generated by Eschalot. Move back to the /var/lib/tor/hidden_service/ directory using cd as seen below.
cd /var/lib/tor/hidden_service/
Within this directory, we'll want to remove the hostname file, as it's going to be replaced by the hostname generated by our custom private key. We can do this using the rm command in terminal as follows.
rm hostname

Next, copy the RSA Private Key generated by Eschalot, beginning with "-----BEGIN RSA PRIVATE KEY-----" and ending with "-----END RSA PRIVATE KEY-----"
This key can replace our automatically generated private key. We can replace it directly using cat with the following command.
cat > private_key
After running this command, right click and paste the key into the command line window, then press Ctrl+D to write changes to the file. To ensure that the file has the correct private key, we can use cat again to view the file as follows.
cat private_key
After updating the private key, we can start Tor again with sudo tor, and check that a new hostname file has been generated by running ls. If a hostname file is in the folder, we can check that it matches our desired address with the following command.
cat hostname

If the hostname matches our desired choice, we can check in Tor Browser to make sure that it resolves to our site.

If the new onion address leads to your site, you've successfully hosted a hidden service, and configured a custom address!

No comments:
Post a Comment